Thursday, January 27, 2011

Paula Deen’s Lots O’ Meat Lasagna


The trouble with eating Italian food is that five or six days later you're hungry again. ~George Miller

What is the first thing you think about when someone mentions lasagna? Is it comfort food, cheesy, Italian, delicious, but too much trouble to make?  I have gone my whole life believing this was a classic Italian dish. It’s on the menu at Olive Garden, so it must be, right?
I discovered about 5 minutes ago, the term ‘lasagna’ actually has a Greek origin. Italians use this word to refer to the serving dish in which it was made. Eventually, the meal took on the name of the dish. To make things even more confusing, one of the first lasagna recipes was featured in the first cookbook ever written in England.  Therefore, some believe lasagna originated in the British Isles.  Whew! That can all get pretty confusing.  I think I’ll just stick with what I know: cooking.
I always believed that making lasagna was a difficult, all day process. Therefore, I have never attempted to make one from scratch. Stouffer’s was good enough for me. After talking to a few friends, I was assured it was not as difficult as I once thought. Especially with the invention of those wonderful noodles you don’t even have to pre-boil. I think with good ingredients and a good recipe, we can make this happen. Plus, everything’s better homemade, right J?
Once again I have, like a beacon in the night, been guided to a Paula Deen recipe from her episode Lovin’ in the Oven.  Click here to view and print the full recipe.  Lasagna Recipe  One thing I noticed specifically about this recipe is that it calls for cottage cheese instead of ricotta cheese. After a little more research, I discovered that this was not necessarily a Southern tradition, but a substitute. Years ago, cottage cheese was probably more accessible than ricotta. Even though ricotta can now be found in most grocery stores (even here in the Valley!), cottage cheese is still used. I’m going with it! It’s a little less expensive and whatever you have left will make a great snack on another day.
Let’s get started.

Step 1: Gather all your ingredients.

Everything you will need!


Step 2: Brown the ground beef, sausage, and garlic together. Drain off any fat once the meat is cooked through.


Step 3: Add the tomato sauce, diced tomatoes, tomato paste, basil, and oregano.


Tada!! Homemade meat sauce.


Step 4: Mix cottage cheese, parmesan cheese, parsley, and egg together. Set aside


Step 5: Begin layering. Start by adding about 1/4 of the tomato sauce to the bottom of a 9x13 inch dish. Add a layer of no-boil noodles (be sure not to overlap). Spread 1/3 of cheese mixture on top of noodles. Top with 1/3 of mozzarella cheese.


Step 6: Bake at 350 degrees for about 45 minutes. Add last layer of mozzarella and let finish baking about an additional 15 minutes. Let sit for 10 minutes before cutting. Enjoy!!
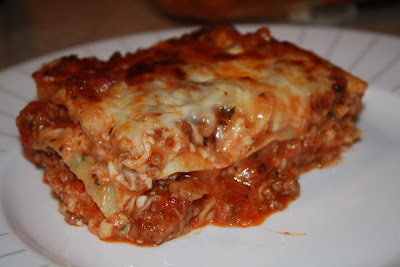


My own little slice of heaven!

I was very surprised at how quick and easy it was to put this together. I did this the night before so my everyday girls and boys wouldn’t have to wait long. Remember when you take something out of the refrigerator to cook, it’s best to bring it to room temperature before putting it in the oven. Otherwise, it may take a little longer than expected to cook through. Mine ended up taking about 20 extra minutes.
Note!!   I never learn my lesson. No matter how much I talk about it, I still have trouble reading a recipe all the way through before starting. The recipe clearly states to bake for 45 minutes, top with remaining cheese and bake an additional 10 minutes. Do you think I listened? Of course not. I was so proud of myself for getting this done the night before; I slapped that last layer of cheese on before I realized I was supposed to wait. Now what? Just treat this like you would a Stouffer’s. I placed a tented sheet of aluminum foil over the lasagna while it baked so the cheese wouldn’t burn. Then remove the foil for the last 15 minutes to allow the cheese to become brown and bubbly.  
Tip: Once the cheese melted, I turned on the broiler to get it really brown and bubbly. Don’t walk away. This happens very fast!
This lasagna is definitely lovin’ in the oven! You can unquestionably taste the sausage, but it is not overpowering. I was so happy with the results that I plan to make enough to freeze next time. Or, split this recipe into 2 square pans and freeze one for a rainy day. Grazie Paula Deen for the wonderful recipe. It was delizioso! I will positively be adding it to my regular dinner rotation.
To continue reading about the history of lasagna, follow this link! http://www.populararticles.com/article175798.html
Ciao!

Anna


Friday, January 21, 2011

Shrimp Creole: it's spicy...like me!


Shrimp Creole is a dish that I've come to love in the last few years.   My mother introduced me to this meal when we started Weight Watchers together about 4 years ago.  Yes, it's a low-fat meal, but don't discount it just because you’re not into counting calories...the flavors don't lie.  It is a very hearty meal with large portions that will leave you waddling away from the table.

There are several things I ♥ about this meal:
1. It’s a lot of food, and this big girl can EAT!!!
2. It’s just the right amount of spicy.
3. I lurve the shrimpies.
4. It takes minimal effort to prepare it, but you can pretend you’ve been slaving all day.
5. It is low in fat and high in flavor. 
6. As I inhale the aromas of this dish, I imagine myself on
Bourbon Street
yelling for beads in true Creole fashion…which makes me smile…and sometimes randomly yell, “I want BEADSSSS!”...which makes the hubby look at me like I’m crazy.

A tiny history lesson:  The Creole heritage is a melting pot in Louisiana and includes French, African, and Spanish origins.  In particular, the French influence on Creole cuisine is descended from the homes of lower class French peasants, while the spiciness of Creole cuisine (and the rice) can be attributed to Spanish influences.  African influences came about in the days of servants, where a lot of cooks were African-American and put their spin on these dishes.  Aren’t we glad these cultures came together???  Makes me want to sing a song: ♪♪“Jesus, loves the lit-tle chillllldren. All the children of the worllllld…”♫

Ok. So here’s the list of ingredients:

4 tsp. olive oil
1 med. onion, diced
1 bell pepper, diced
2 tsp. minced garlic (pop open the jar that’s already in your refrigerator)
1 28-oz. can diced tomatoes
3/4 lb. shrimp, peeled and deveined (Don’t be ashamed to buy the frozen kind that are already peeled and ready to go.  Just make sure you thaw before you cook! Email me and I’ll tell you exactly where to find them in Kroger.)
2 c. frozen okra
4 tsp. Emeril's Bayou Blast seasoning (can be found at Kroger or Wally-World. It has a black top.)
2 c. cooked brown rice

It really is very simple, with little prep work and just a few ingredients.  Just because I got a wild hair, I diced my onions and bell peppers the night before and stored them in a Ziploc bag in the frig (one less step for me at dinner time!). 

Step 1: As soon as I got home from work, I heated the oil in a large pot (like one you’d use to make soup in b/c it makes too much to use something smaller). 

Heating the E.V.O.O.

Step 2: While this is heating, I went ahead and put some water on in another large pot to cook my rice (throw some salt into this water, ok??).  Just pick your rice of choice and follow the instructions on the box.  No need to complicate things ☺.

Step 3: Add garlic, onions, and peppers to the oil and cook until the veggies are soft, about 5 minutes or so. 
Sweating the onions and peppers

Step 4: Dump in the can of tomatoes (juice and all), Emeril seasoning (bam!), and your frozen okra. Stir in and simmer for about 10 minutes until all the wonderful flavors are blended together.
Adding the spices


Look at the pretty colors!


Step 5:  About 3 minutes before you’re ready to eat, drop your shrimp in the pot.  If you bought the frozen kind, make sure you’ve thawed them out.  I moved mine from the freezer to the frig the night before, and they were good to go!  CAUTION: Watch your little shrimpies!  They only take a few minutes to cook.  For real.  Don’t get side-tracked.  Once they turn pink and become opaque, they are ready.  Over-cooked shrimp makes me think I’m chewing on a rubber sole.  I know because I actually did forget them this time. I admit it. Don’t be like me.  Friends don’t let friends over-cook “scrimps”. Let’s put that on a t-shirt.

Adding the best part!

Step 6:  Serve over rice and enjoy! 

This recipe is supposed to be 4 servings (and if you do Weight Watchers it’s 6 points per serving).  I need to take a moment and endorse Emeril’s Bayou Blast seasoning.  No, I don’t get paid. He has no clue who I am.  But this stuff is REALLY good.  It comes highly recommended by yours truly.
I see yo head, Emeril!

I hope you enjoy this recipe.  At this time of the year, when there’s a chill in the air, a warm, hearty meal like this calls my name.  The fact that this is a low-fat meal is just icing on the cake for those whose new year’s resolutions include dropping a few lb’s.  Remember: low-fat does not have to equal low-taste! Bon-appetite and laissez le bon temp rouler!

BONUS ALERT!  What’s that you say??? Here’s a website of some Cajun expressions for your reading pleasure.

If you have any questions, please feel free to leave a comment to this post or email us at www.everydayrecreations.com.


Wednesday, January 19, 2011

Do you follow???


Are you sure you're following us?  Check the followers list on the right side of the blog, and make sure your pretty face (or just a name if you’ve opted to not post a pic) is showing up. We want to make sure everyone who wants to follow is following, because we LOVE you (awww) and want you to have every opportunity to win free stuff during giveaways!  If you need help, email us at everydayrecreations@gmail.com and we'll be glad to walk you through.  As always, thanks for supporting us in our cooking adventures!!!  Happy reading!  

Everyday Girls

Monday, January 17, 2011

And the winner is...


COURTNEY PEACOCK!!!!

Congratulations, Courtney.  Contact us at www.everydayrecreations.com to claim your prize.  Thanks to all who entered the contest!  We will have many more giveaways so KEEP ENTERING for your chance to win!

Check out Courtney's comment:
"My favorite thing to cook is my mama's Baked Ziti. Every time that I would come home for the weekend from college, I would beg Mama to make this for me. It brings back the best memories of her and is now a family favorite in the Peacock house! Love you girls!"

Friday, January 14, 2011

Hope Duck's Not the Main Course!

This week we had a tailgating party!  We all gathered with new finger foods that are great for any party.  My main dish was duck.  Duck isn’t usually the first thing that comes to my mind for tailgating.  That is unless your team is playing the Oregon DUCKS for the National Championship!  What perfect timing to try cooking up the ever so fancy and feared fowl.   I’ve heard all the, “I don’t like it” “It’s really fatty” “Tastes like dark meat” But, I’ve never had it, so I don’t know what to believe.   I want to be able to add my two cents, and if my borrowed duck recipe changes someone’s mind then great!

I found this recipe on cooks.com and tampered with it a bit.  You can find it here.

Let me preface this by saying, think ahead! Duck is hard to find, unless you want the entire bird frozen, and I didn’t.  I just needed a breast or two since my recipe is for kabobs, and it’s just an appetizer.   Seeing as I’ve never even seen a dead duck I did some light reading and found out that the breast is actually large enough to feed two.  After calling Publix, Kroger, and the Meat Store (yeah, you’d think they’d have it, right?) I figured this is a pretty tricky fowl to get your hands on.   Grasping for air I called one more place: the Earth Fare Market.  Yes! (Sigh of relief- nothing else would suffice) They will order it for you, and have it in in about a day or so…..that is if everyone in your surrounding area wasn’t also looking for duck! They couldn’t get my order in, but they did have a package of frozen breasts.  (Have you heard the word “breasts” enough?) So, I bought those.
If you get frozen, be sure to again, think even more ahead!  I thawed it 2 days in advance in the refrigerator. 
One day before the big game, I cut up the duck, and let it marinate over night. 
It was equal parts hot sauce, soy sauce, and teriyaki sauce.  I used ¼ cup of each for 2 breasts.
When you’re almost ready to cook your duck, wrap it in bacon and slip it on a skewer.
 Grill for about 15-20 minutes on low.

If only it were all that easy!!!!  This duck brought me many challenges.  First, I used wooden skewers.  I soaked them in water like everyone suggests, but they still burned.  I will go out and buy metal skewers from now on to use always.  I will never trust you again, wooden skewer.  Next, my main grilling man left the Everyday Girls to venture out West to attend this, said, big game.  So, Dad was put on grilling duty.   Keep in mind this was the worst night we had with all the ice, so he was trying to avoid the harsh conditions and grill inside my garage with no lights.  NO lights, people! 
The bacon was a little crispy to say the least.   He pulled them off the grill, set them in the dish, and then he tried to put up the grill.  With an unlevel driveway, the dish slid right onto the ground.  Smash!  Shattered pieces of glass and dirty bird were rushed inside in my dad’s hands while he’s screaming, “Hope duck isn’t the main course!”   Hilaaaaarious!  Bless his heart, he was upset, but no big deal! With a little rinse of water, the duck was as good as new!  Since the bacon was a little crispy, we couldn’t tell if there was dirt/glass or not! =)
 OK, seriously.  The duck was really pretty good.  I didn’t eat the top layer of skin or the bacon.  But, as I understand the skin helps keep the duck moist, so I’m glad I (my dad) cooked it with the skin on.  I’m sure the bacon added to its flavor, too, because what doesn’t bacon help add flavor to??  The duck had the texture and flavor of steak almost.  I didn’t hate it! The skin and bacon helped, but the marinade gets all the credit.  You could definitely taste it, but not overwhelmingly.


 It was the perfect night, perfect game, and perfect dish!

War Eagle!
(this view may or may not reflect the views of the other everyday girls)

To add, my 90 year old granddad said it was the best duck he’s ever had.  I’ll accept that!


*Check out our ‘Recipes’ tab for all the goodies Anna and Andie brought.  They introduced some newbies that are definite keepers!

Wednesday, January 12, 2011

It's Giveaway Time!!!!


ATTENTION DEAR FOLLOWERS: Need a new kitchen knife???  Post a comment on the blog telling us your favorite thing to cook and why, and you could win one!  It’s sharp. It’s cute.  It has your name written all over it!  Serial killers need not apply.  You must be a blog follower to win…so hurry up and follow if you don’t already!  Winner will be announced Monday, January 17th at 10:00 AM.  Good Luck!

--Andie, Anna, and Kirby

Thursday, January 6, 2011

P.F. Changs Lettuce Wraps

It is an understatement to say I LOVE PF Chang’s Lettuce Wraps, and after a brief facebook survey, I am not the only one.  They are spicy, crunchy, and cool all at once. They are by far one of the best appetizers out there. I received an email from my Lettuce Wrap loving friend, Derek, about 2 months ago with this recipe attached. His hairdresser, Kim, came up with this re-creation on her own. Now that the holidays are over and I have a little time on my hands, I will now attempt to re-create it and only hope it’s half as good as the original.
When glancing at the recipe, I realize that there are a lot of ingredients listed (15 to be exact).  I usually try to keep most of my recipes down to a few ingredients, but I have been assured that the cooking is easy. I did have to step outside my comfort zone and purchase a few ingredients I don’t normally work with, like fresh ginger and rice noodles. Don’t think using powdered ginger didn’t cross my mind, but I want this to be as authentic as possible.

Here we go…
When starting a recipe with lots of ingredients, I think it is best to prep all your ingredients first. Otherwise you can fall behind and things can burn while you finish prepping your next ingredient (not that I know any of this firsthandJ).
Upon realizing all the chopping that had to go into this, I decided this would be a prime time for me to knock the dust off my mini-chopper and try to save myself a little work. I then realized that I wanted to take my new knives for a test drive. The knife was awesome, but I would definitely attempt to chop in the machine next time. It might save a little time.


All ingredients: prepped. Whew!


After chopping/measuring all the ingredients, the only thing left to do was to cook the rice noodles. The noodles don’t add a lot of flavor to the wraps, but they do add some crunch. If you didn’t want to deal with them, just leave them out. Although, I like the added texture.
ATTENTION: There are specific directions on the back on the package for a reason!! I was sure the oil was hot enough the first time, but boy was I wrong. The first batch of noodles I put in just absorbed the oil and sank to the bottom. I just assumed they were cooking. Then suddenly, I glance in the pot and see what you see on the left of the picture. Not what they are supposed to look like. Once I removed the burned up mess of noodles, I dropped in just a few to see what would happen. They puffed up as soon as they hit the oil and were ready to come out immediately. Only cook a few at the time, or your kitchen will be overflowing with noodles. Whew!

Incorrect / Correct...Any questions?


Exact Recipe:


2 tablespoons canola oil
1 tablespoon fresh ginger root, minced
3/4 cup shredded mushrooms
1 can water chestnuts drained, chopped
1 1/4 pounds skinless, boneless chicken breast halves, cut into bite size pieces
4 tablespoons rice vinegar
4 tablespoons teriyaki sauce
2 tablespoons soy sauce
1/2 teaspoon garlic powder
Red pepper flakes, to taste (I used ½ teaspoon)
1 cup shredded carrots
1/4 cup chopped green onion
1/3 cup toasted and sliced almonds
12 leaves of lettuce
1 Bag rice noodles, prepared according to bag (I cooked about 1/3 of the bag and it was plenty)


1. Heat 1 tablespoon of oil in large skillet over medium heat. Add ginger, mushrooms, carrots, water chestnuts and chicken. Sauté until cooked through, about 7 to 10 min. Set aside.


2. In large bowl, whisk together 1 tablespoon oil, vinegar, teriyaki sauce, soy sauce, garlic powder and red pepper flakes until mixed well. Add chicken mixture, green onion and almonds; toss together.

3. Serve over rice noodles. Enjoy!!!

Lookin' good!

Well, I’d say they were a hit!


Going, going...

Gone!!!
My husband loved them. He wants me to make them again next week. Not for an appetizer, but for dinner. I think they were extremely close to P.F. Changs. Now that I’ve been schooled on how to make rice noodles and already have the staple ingredients for this recipe, I would definitely make it again. I just may do some of the chopping the night before. Thanks for the recipe, Derek!
If you don’t want to make you own, find a P.F. Changs near you and try them out! http://www.pfchangs.com/index.aspx

Anna


Monday, January 3, 2011

Semi-homemade Chicken and Dumplings


This round I opted for a true re-creation--since that IS the name of the website--and picked Sandra Lee's chicken and dumplings as my target.  Chicken and dumplings have piqued my interest only in the last couple years.  I never cared for them as a child--and I'm just BARELY out of my childhood :)  (Pass the Botox, please.) It's just recently gotten very cold outside, and when it's cold, comfort foods call my name--even ones I've never been fond of apparently! 

I saw this Semi-homemade recipe on the FoodNetwork for chicken and dumplings and thought I'd give it a whirl!  The thing I love about Semi-homemade meals is that it fits my lifestyle very well :)  By the time I get off work and run by the grocery store (because I rarely ever plan ahead) I often don't have a lot of time to prepare dinner before my husband and/or I are heading off to our next obligation. 

Let me just say...being refined in the art of procrastination as I am, I had set up the time for the Everyday Girls to meet a couple or three days before I was actually cooking, and STILL waited until I got off work on the day of to hit the grocery store.  I guess I'll never learn...On the positive side, it makes every visit to the store like an episode of Supermarket Sweep--dashing up and down aisles like a mad woman on a mission--which can be quite fun unless the Kroger security man shakes his finger at you in the self-checkout lane! Whoops!
Anyway, I printed off the list of ingredients and grabbed as quickly as I could--in and out of the store in about 7 minutes.  It would've been less time, but  A). I couldn't find chicken gravy, B). the rotisserie chicken wasn't in the deli section (It was in what the deli lady affectionately referred to as the "Hen House" close to the check-out.), and C). an eccentric family member grabbed my buggy while I had my back turned and hid it from me for a hot minute as a joke.  I admit I laughed.  Gotta love family.  On my way home, I called on my sous chefs (Anna and Kirby) for the evening to help get dinner on the table more quickly.  It really didn't take that long at all.  I got home around 5:45PM and we were eating by 6:30.  Not bad!
As my oil was heating in the pot, Kirby and I chopped carrots and celery.  We decided we didn't want to put the full 14 ounces of both vegetables in our pot, so we didn't.  That's the beauty of cooking your own meals.  If you don't want as much of an ingredient as a recipe calls for, change it or even omit it if you want!  Once chopped, we threw the carrots, celery, and pre-chopped frozen onions in the pot to sweat.  I also added a couple tablespoons flour at this point, because several reviews mentioned the broth being quite soupy.
While the veggies were softening, Kirby and I shredded the chicken and Anna pulled the biscuit dough into about 7 or 8 pieces each.  We decided to make smaller dumplings after reading some of the recipe reviews and seeing that several people commented on how big the dumplings were when cut into quarters.
About halfway thru shredding chicken and tearing dumplings, the veggies were good to go so I went ahead and added the broth (I only used 4 cans instead of 6), poultry seasoning, and s&p. I also added a can of cream of chicken soup instead of chicken gravy (only because I couldn't find it!) at this point.  This simmered for 4-5 minutes. 
Once we finished shredding the chicken, we threw it in the pot and placed the biscuit dough on top.  They started puffing up immediately and looked so cute like little pillows of fluffiness floating on top.  Awww...I popped a lid on top and let it simmer for about 10 minutes until the dumplings were done.
The chicken's taking a dip!

Fluffy dumplings = pillows of goodness
The biscuit dough thickened the broth a bit, but it was still soupier than any chicken and dumplings I've ever had.  And come to think of it, I've never had chicken and dumplings with carrots and celery in it either.  In my opinion, it was more like chicken soup with dumplings.  The taste was good--I would definitely make it again.  However, I was slightly disappointed at how liquid the broth remained (even after I added flour and used less liquid than the recipe called for).  I do have to say that the dumplings were very good this way and saved a lot of trouble. I do love a canned biscuit ♥♥  In conclusion, though I was not 100% satisfied with the soupiness, the pot was empty when we finished eating so it must not have been too bad J.  Try it.  Easy and good on a cold winter’s day! 

The final product
  Here's the link again for the recipe and reviews of this recipe. Happy New Year!!!